Open cabinets are design and storage elements within your project composition. They can be made in standard dimensions or custom sizes and assembly and installation instructions vary depending on their characteristics:
- Shape: Straight or curved
- Location: base cabinet, wall cabinet, or wall unit.

The assembly process is very simple: it is done using hidden lamellos in the shelves or horizontal panels. These detachable assembly elements provide great stability and rigidity to the structure, resulting in a solid and aesthetically pleasing finish.
Caractheristics
1. Straight Open Cabinets
- Legs: Both base and tall cabinets have pre-drilled holes for METOD legs. These help support the cabinet and ensure it is level.
- Depth: Ranges from ⤡20 to ⤡62.3 cm.
- Height: Minimum ↕20 cm, maximum ↕228 cm. For a total height of 240 cm, the configuration will include two cabinets.
- Width: Minimum ↔15 cm, maximum ↔120 cm.
- Shelves: From 0 to 5 units, always equidistant.
-Mar-18-2025-07-30-11-2600-AM.png?width=196&height=298&name=image%20(3)-Mar-18-2025-07-30-11-2600-AM.png)
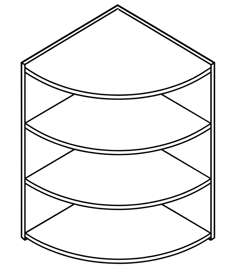
2. Curved Open Cabinet
- Legs: both low and high cabinets have METOD leg mechanisms. These help support the cabinet and ensure it is level.
- Available dimensions:
- For cabinets with a depth ⤡60 cm: ⤡623x↔623 mm
- For cabinets with a depth ⤡37 cm: ⤡396x↔396 mm
- The ↕height can vary depending on the cabinet up to a maximum of ↕228 cm
- Shelves: 0 to 5 units, always equidistant.
Preparation
- Each cabinet piece is identified with a sticker containing a code. These codes help with the correct positioning and assembly of the parts.
- You will need a 4mm Allen key and a drill for the assembly (not included in the package).
- Pins for the shelves are included.

Assembly
1. Straight Open Cabinets
First, the open cabinet is assembled independently, and then attached to the furniture line.
- Place the central panels onto one of the side panels. Use the Allen key to tighten and secure the parts firmly.
- Insert the back panel by sliding it through the groove on the front panels.
- Attach the other side panel and secure each central panel with the Allen key.
- Insert the shelf supports into the pre-drilled holes in the side panels, then place the shelves on the supports, ensuring that the bottom recesses fit correctly.
- Cover the visible holes with the supplied caps if necessary.
2. Curved Open Cabinets
First, assemble the open piece of furniture independently, and then attach it to the furniture line.
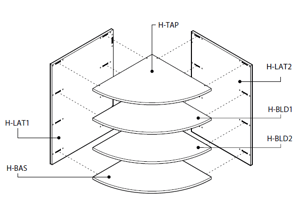
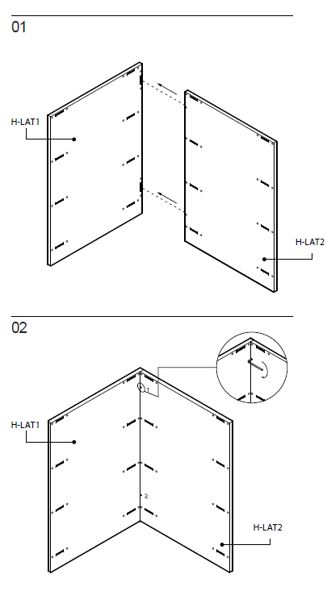
- Locate the H-LAT1 side panel, which will be a few cm longer than H-LAT2, as it absorbs its thickness.
- Assemble it and secure it with the Allen key.
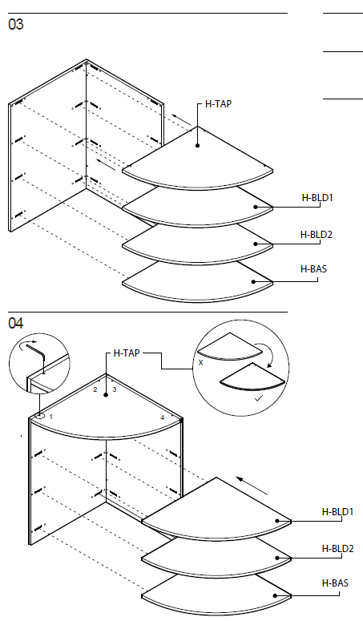
- Locate the top shelf H-TAP and the bottom shelf H-BAS.
- Depending on the position of the shelf, it should be positioned with the holes for the metopes facing up or down.
- Except for the top cover, the shelves should be adjusted from below.

To attach to the furniture line, installation varies according to the type of furniture:
Base Cabinets and Tall Cabinets
These cabinets rest on the floor.
-Mar-18-2025-07-30-11-2600-AM.png?width=293&height=446&name=image%20(3)-Mar-18-2025-07-30-11-2600-AM.png)
- Alignment: Ensure that the front of the open cabinet extends 2.2 cm beyond the IKEA structure so that it aligns perfectly with your CUBRO fronts.
- In some cases, it is recommended to fix the cabinet to the wall when it cannot be screwed to an adjacent cabinet. If this is necessary, you will receive instructions from your Design Expert.

Wall Cabinets
Wall mounting: These cabinets are hung on the wall and require specific hardware, which is not the IKEA rail. To secure these cabinets to the wall, they come with two concealed hangers on the back (left and right) and an additional hanger that must be mounted on the wall.
-png-1.png?width=240&height=425&name=image%20(23)-png-1.png)

-Mar-18-2025-07-31-02-3946-AM.png?width=244&height=347&name=image%20(4)-Mar-18-2025-07-31-02-3946-AM.png)
Installation
- Access the hanger screws through two circular holes in the front of the cabinet.
- Use these screws to adjust the height (lower hole) and the depth of the cabinet (upper hole) in relation to the wall.
- Once the cabinet is leveled, use the included plugs to cover the access holes for the screws, ensuring a clean and professional finish.

Notes
- Different types of walls require different anchors and screws.
- The bottom of the wall hanger should be positioned 7 cm below the desired final height of the cabinet.
- The IKEA rail must not be behind the open cabinet, so you will need to cut it to avoid interference.